
Selecting the correct wire gauge, as outlined in our comprehensive wire gauge selection guide, is foundational to the safety and efficiency of electrical installations. A mistake in this selection process can have serious repercussions. These include overheating, fire hazards, and inefficiency in electrical systems.
This underscores the critical role of wire gauge selection in maintaining operational integrity and preventing accidents.
Mistakes are often made during the wire gauge selection process due to:
- Underestimating the electrical load
- Ignoring voltage drop over long distances
- Neglecting environmental factors
These common pitfalls highlight the value of expert guidance in navigating the complexities of wire gauge selection. Much like how SmartBarrel’s time tracking solutions enhance project efficiency and safety.
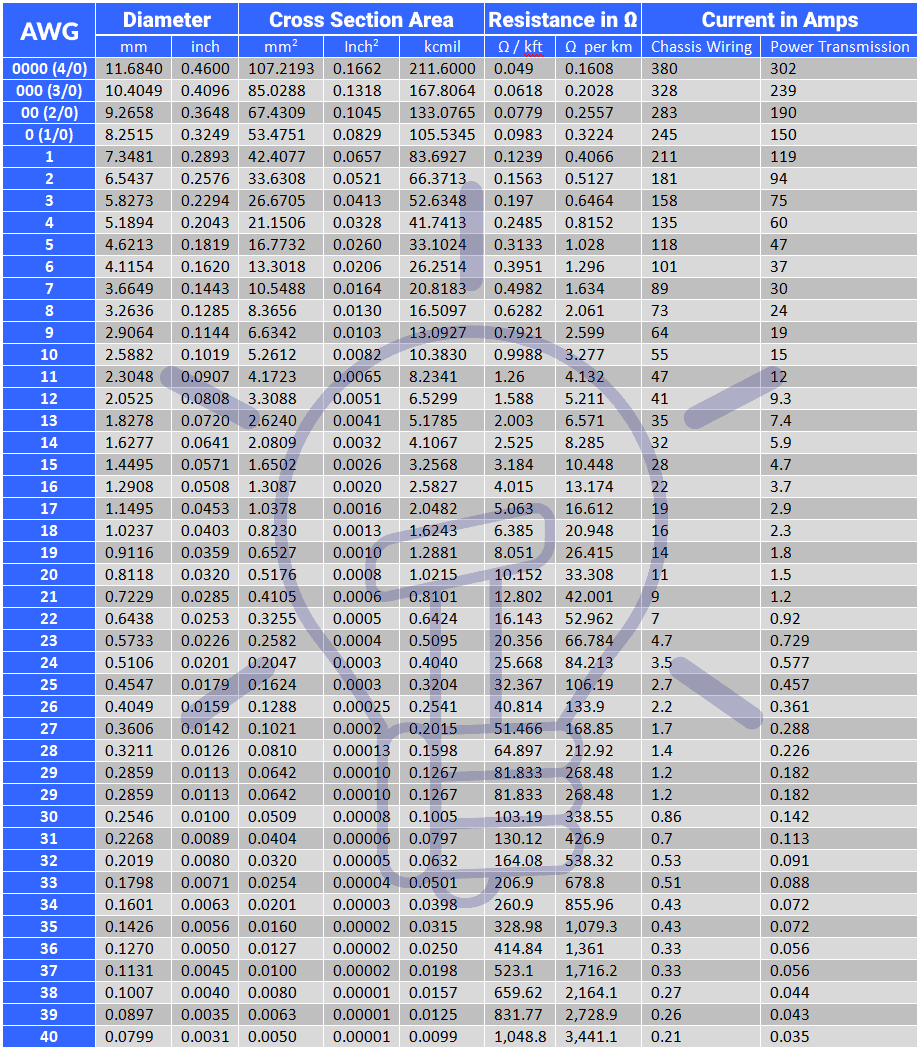
To better understand the implications of wire gauge selection, refer to the Wire Sizing Chart below.
This chart illustrates the relationship between wire gauge, current capacity, and length. It emphasizes the importance of accurate selection.
Key Takeaways from the Guide
The journey to mastering wire gauge selection involves several key steps. Each is crucial for ensuring the safety and efficiency of your electrical projects:
- Acquiring a fundamental understanding of wire gauge selection basics.
- Learning how to choose the correct wire gauge for various projects.
- Gaining insights into expert tips designed to help you avoid common mistakes in wire gauge selection.
By adhering to these guidelines, individuals and professionals alike can ensure their electrical systems are both safe and efficient. This mitigates risks while maximizing performance.
Understanding Wire Gauge Selection

Understanding the wire gauge selection guide is crucial for the safety and efficiency of electrical systems. This guide aids in making informed choices.
Define wire gauge and its significance in electrical installations
Wire gauge, indicating a wire’s diameter, plays a pivotal role in electrical installations:
- Determines the electrical current capacity a wire can safely carry.
- Prevents overheating by ensuring the selection of the correct gauge.
- Enhances electrical safety and system efficiency.
Through these points, it’s clear that wire gauge selection is not just a technical detail but a fundamental aspect of ensuring the sustainability and safety of electrical systems.
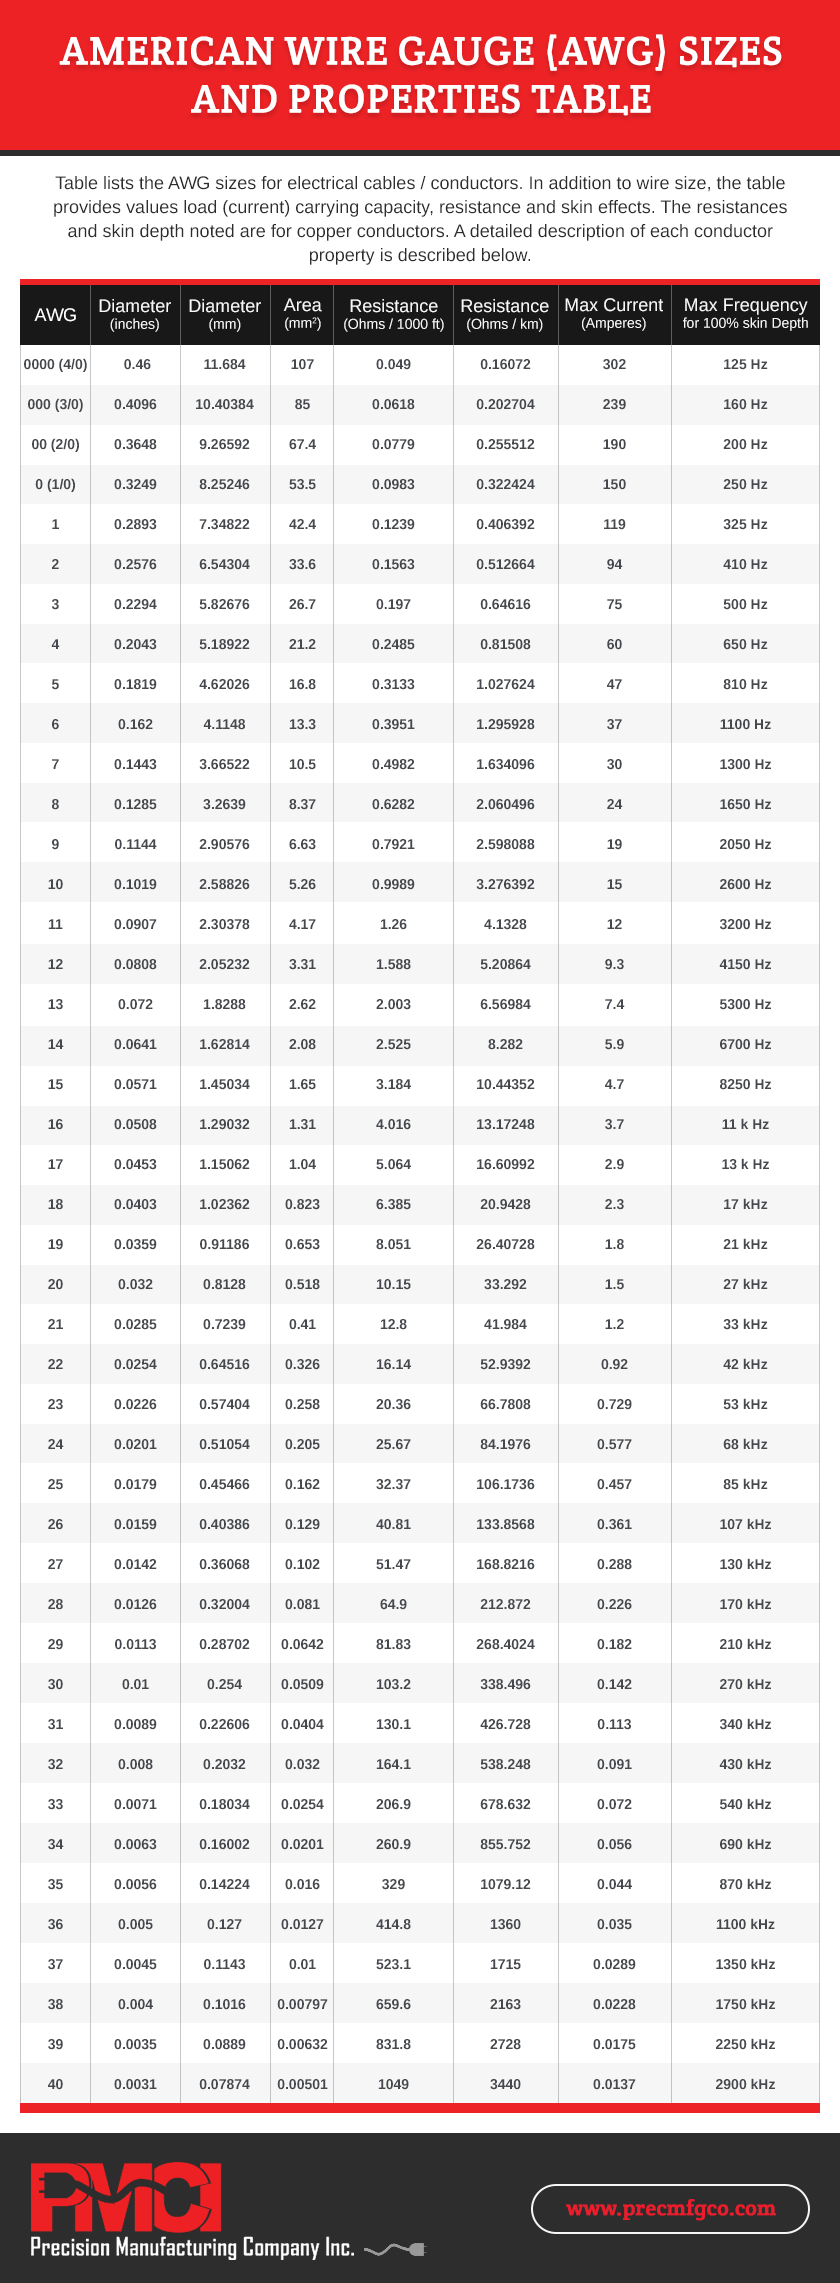
Use the American Wire Gauge (AWG) system as an example
The American Wire Gauge (AWG) system is widely used in the United States. It standardizes the sizes of wires, thereby simplifying wire gauge selection. In this system, a smaller number corresponds to a larger diameter. For instance, a 12 AWG wire is thicker than a 24 AWG wire. This inverse relationship is crucial for understanding how to choose the right wire gauge for specific needs.
Explain how wire gauge affects electrical current capacity and safety
A wire’s gauge directly influences its electrical current capacity. A thicker wire, bearing a smaller AWG number, is capable of carrying more current. This characteristic is pivotal for reducing the risk of overheating and potential fire hazards.
Selecting the appropriate wire gauge is fundamental for electrical safety, ensuring your installations comply with regulations and can handle the intended electrical load.
Beyond preventing accidents, proper wire gauge selection significantly contributes to the longevity and reliability of electrical systems, ensuring operation within safe parameters. It also ensures that electrical systems function within their optimal parameters, avoiding unnecessary stress and potential malfunctions.
Choosing the correct wire gauge is key to electrical safety and efficiency. This wire gauge selection guide equips you with the knowledge to avoid common pitfalls, ensuring your projects adhere to safety and efficiency standards.
Prerequisites for Wire Gauge Selection

Selecting the appropriate wire gauge requires meticulous planning. It’s a critical process that lays the groundwork for the safety and efficiency of electrical systems. Before diving into this task, it’s essential to understand the foundational steps involved in making the right decision.
This begins with a comprehensive assessment of electrical load requirements and an evaluation of distance and voltage drop impacts.
Assessing Electrical Load Requirements for Wire Gauge Selection
The first step in wire gauge selection is calculating the total electrical load of your project. This critical calculation influences not just the choice of wire gauge but the overall efficiency and safety of your electrical system.
Importance of calculating the total electrical load.
- Understanding the total electrical load is fundamental. It ensures the wire chosen can handle the amperage needs without risks of overheating or fire hazards. This encompasses tallying up the wattage used by all devices to be powered by the circuit.
How to calculate amperage needs for a project.
- Calculating your project’s amperage needs involves summing the wattage of all devices to be powered and dividing by the system’s voltage. This crucial step determines the amperage requirement, guiding the wire gauge selection. Simplifying this process, assume your system operates at 120 volts and you’re powering devices that altogether consume 600 watts. Your circuit will need to support 5 amps of current (600W ÷ 120V = 5A).
Considering electrical load is paramount because it directly impacts wire gauge selection, which, in turn, affects the efficiency and safety of electrical installations. Understanding direct labor costs is also crucial, as it adds depth to the financial assessment of wire gauge selection.
Evaluating Distance and Voltage Drop
Voltage drop, a critical consideration in wire gauge selection, results from electrical resistance within the wire over distances. It refers to the decrease in voltage as electricity travels along a wire, which can adversely affect electrical device performance if not accounted for.
Explain voltage drop and its impact on wire gauge selection.
- Over long distances, this drop can reduce the voltage available to devices, potentially leading to underperformance or damage. By choosing a proper wire gauge, especially for lengthy runs, you can minimize voltage drop and maintain optimal device function.
Tips for calculating distance and adjusting wire gauge accordingly.
- The formula for estimating voltage drop is: Voltage Drop = (Current * Resistance * Distance * 2) / 1000. If computations reveal that the voltage drop exceeds acceptable levels (typically no more than a 3% drop is advised), opting for a higher gauge (thicker) wire could be necessary to ensure adequate power delivery.
By assessing electrical load and considering voltage drop, you lay a solid foundation for wire gauge selection. For seamless integration with existing systems, explore SmartBarrel’s construction management solutions. These considerations ensure your projects are safe, efficient, and tailored to meet specific electrical demands.
As we transition to understanding common mistakes in wire gauge selection, remember that every detail in preparation can significantly influence the success and safety of your electrical installations. By applying the wire gauge selection guide principles discussed here, you can navigate complex decisions with confidence and precision.
How to Choose the Correct Wire Gauge: A Wire Gauge Selection Guide

Choosing the right wire gauge is vital for the safety and efficiency of electrical systems. The following steps provide a clear guide to making informed decisions in wire gauge selection. By following these steps, you can avoid common errors that lead to inefficient and unsafe electrical setups.
Step 1: Calculate Total Amperage – Understanding Total Amperage in Wire Gauge Selection
The first step in wire gauge selection involves calculating the total amperage of the circuit. This calculation is crucial because it determines the electrical load the wire needs to handle.
- To calculate total amperage, add up the amperage draw of all devices on the circuit. Remember to consider both peak and continuous loads. For instance, a device might use more power at startup (peak load) than during its regular operation (continuous load).
- Understanding both types of load is important. It helps ensure the selected wire can handle sudden increases in power without overheating or causing damage.
Calculating total amperage correctly lays the foundation for selecting a wire gauge that will safely and efficiently accommodate the electrical needs of your project. After calculating the total amperage, it’s crucial to consult wire gauge charts to select the appropriate wire size. This ensures the wire can handle the electrical load safely and efficiently.
Step 2: Consider Distance and Voltage Drop – Calculating Voltage Drop for Accurate Wire Gauge Selection
Distance impacts the efficiency of electrical transmission. A longer distance requires careful consideration of voltage drop to ensure adequate power delivery to devices.
- Adjusting wire gauge based on distance is essential. As distance increases, so does resistance, which can lead to voltage drop.
- To calculate voltage drop, use the formula: Voltage Drop = (Current * Resistance * Distance * 2) / 1000. If the calculated voltage drop is too high, choosing a thicker wire might be necessary to ensure efficient power delivery.
This step is critical, especially in larger installations where devices are far from the power source. By accounting for distance and voltage drop, you can prevent underperformance or damage to devices.
Step 3: Factor in Environmental Conditions – Selecting Wire Insulation Types
Environmental factors like temperature and humidity can impact wire capacity and insulation effectiveness.
- Temperature and humidity can affect wire conductivity and insulation. In environments with high temperatures or humidity levels, wires might need to carry less current than their rating suggests.
- Choosing the right wire insulation types based on environmental conditions ensures long-term safety and efficiency. For example, wires used outdoors or in industrial settings might require more robust insulation to protect against environmental stressors.
Considering environmental conditions in your wire gauge selection helps safeguard against unexpected failures due to external factors.
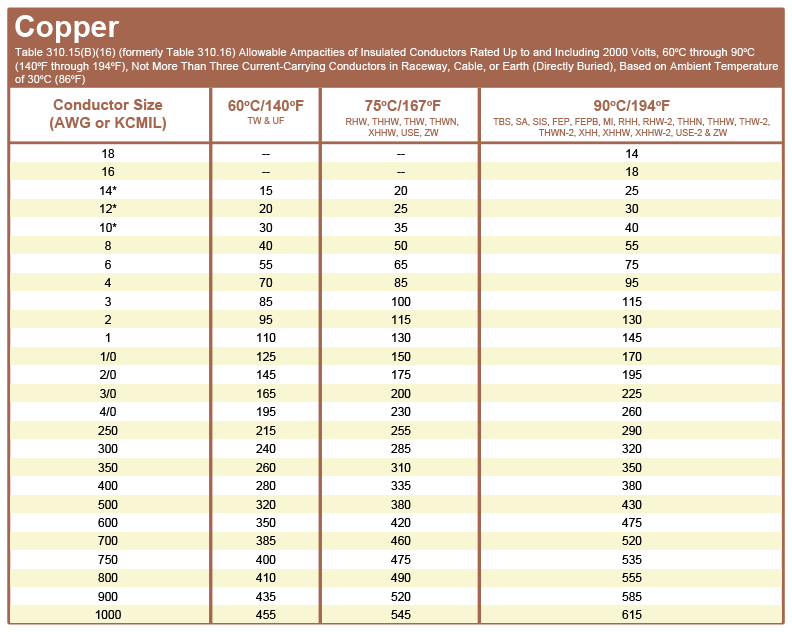
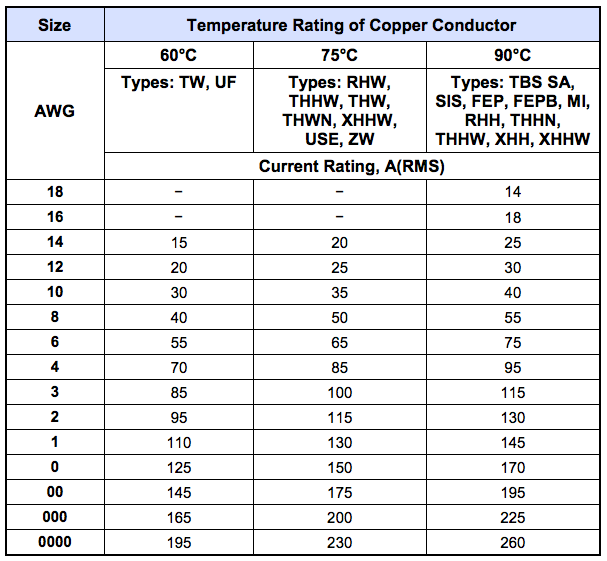
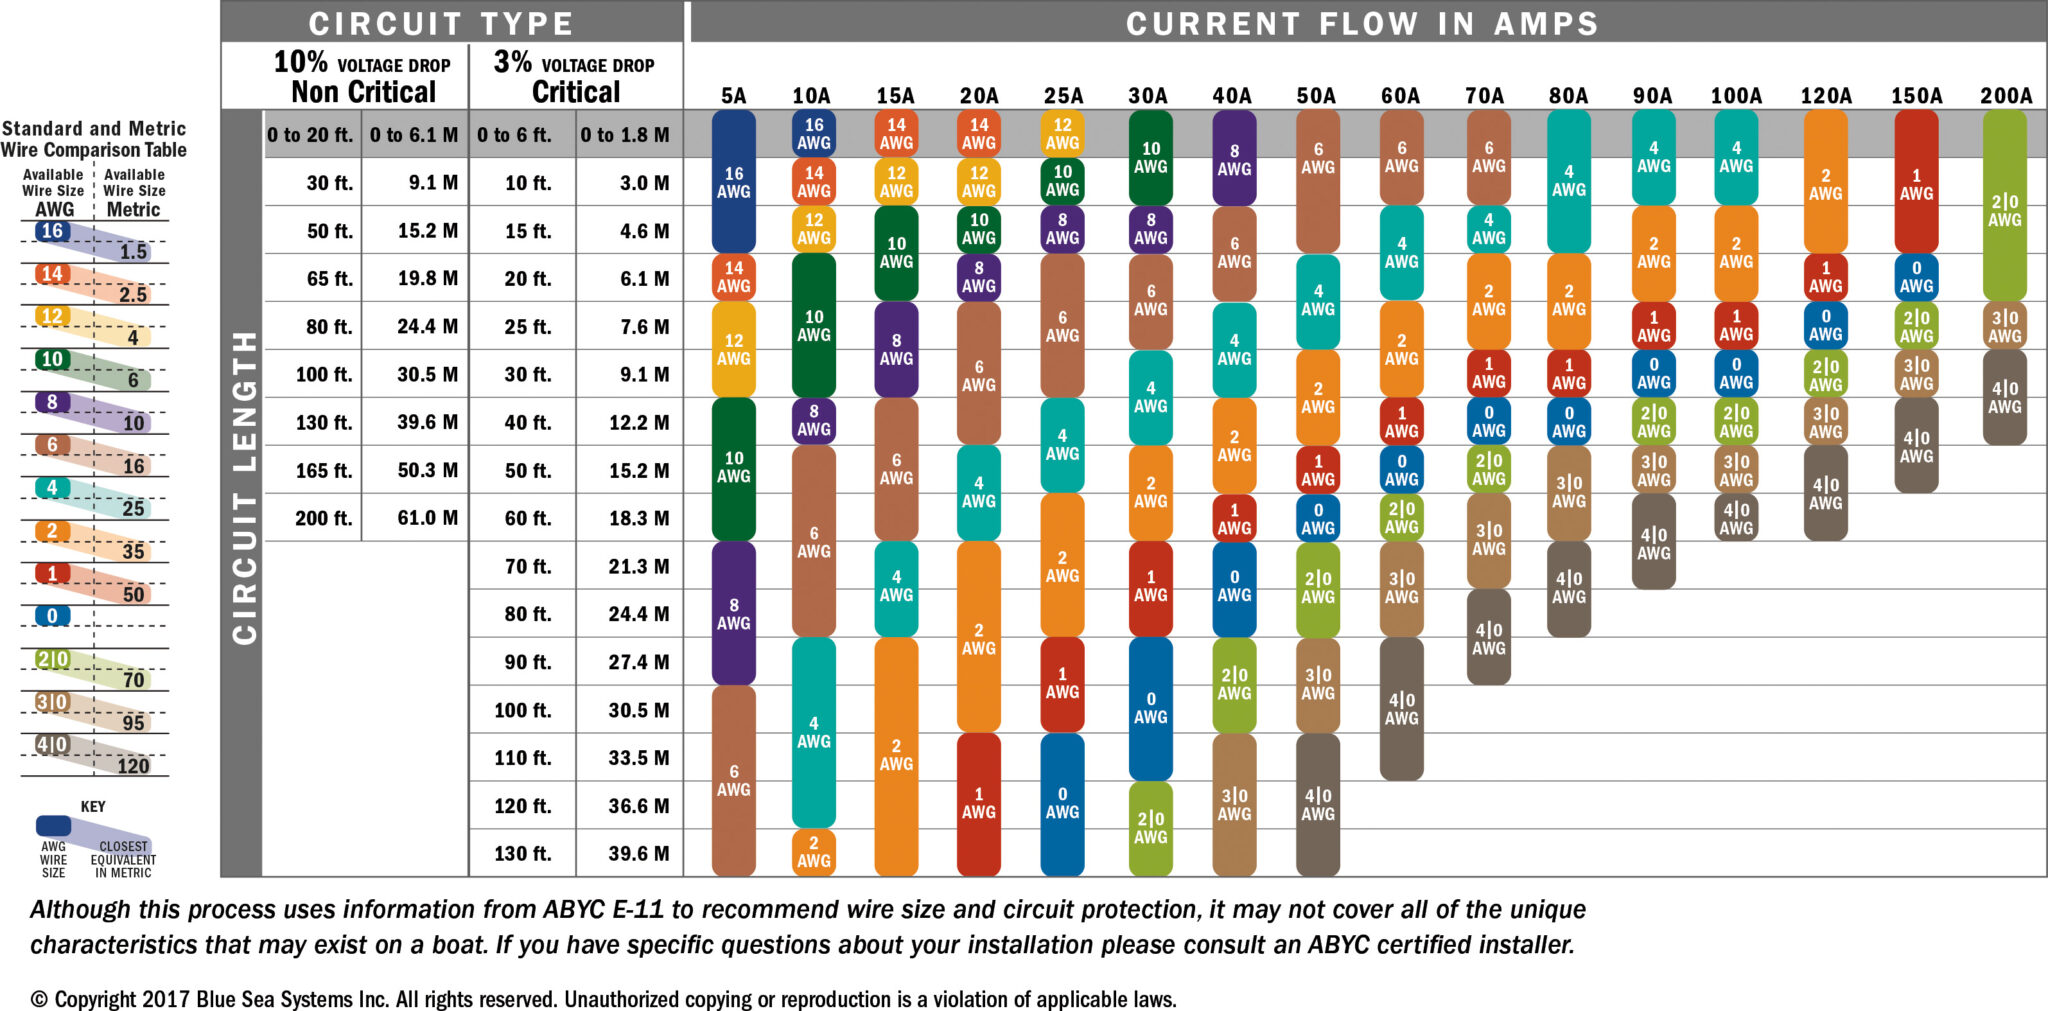
Step 4: Consult Wire Gauge Charts – Utilizing Wire Gauge Charts for Selection
Wire gauge charts are invaluable tools for selecting the appropriate wire size. They provide a reference based on amperage load and distance.
- Wire gauge charts help translate your calculations into a specific wire gauge selection. After determining total amperage and accounting for voltage drop, consult these charts to find the recommended wire size.
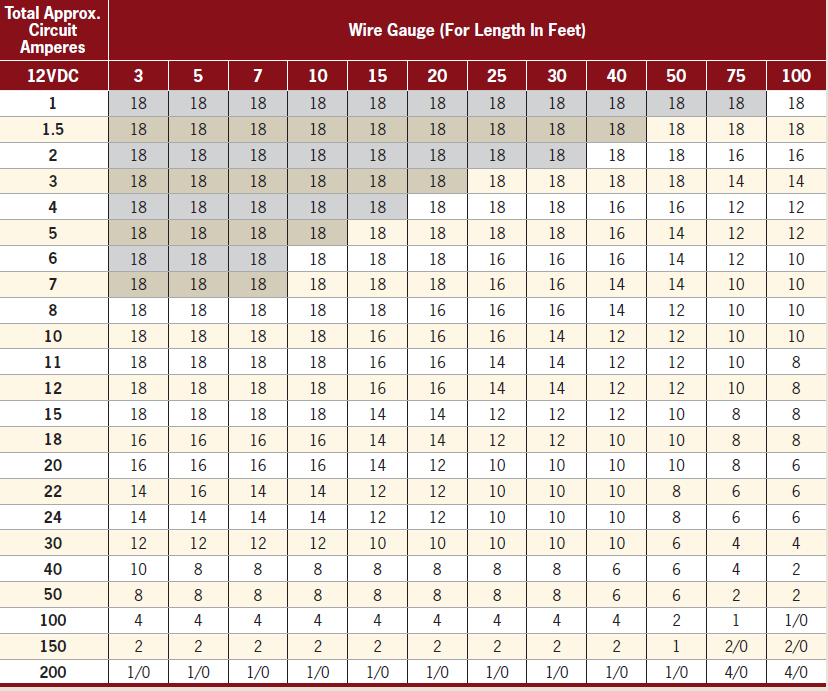
- For example, using a chart, you might find that a circuit with a 30A current over 50 feet requires an 8 AWG wire for non-critical applications but a 4 AWG wire for critical applications. This decision ensures efficient power delivery with minimal voltage drop.
To better understand the impact of current flow and circuit length on wire gauge selection, let’s reference the following charts.
These charts illustrate how current flow and circuit length influence wire gauge selection, emphasizing the importance of consulting these charts for accurate decisions.
Step 5: Apply Safety Margins – The Role of Safety Margin in Wire Gauge Selection
Adding a safety margin to your calculations accounts for unforeseen increases in load or changes in environmental conditions.
- The importance of adding a safety margin cannot be overstated. It provides an additional layer of security, ensuring the system remains safe and efficient even if conditions change.
- An appropriate safety margin might involve selecting a wire one size larger than what your calculations indicate. This choice compensates for potential unknowns and ensures long-term reliability.
By incorporating a safety margin into your wire gauge selection, you mitigate risks associated with unexpected demand increases or environmental shifts, safeguarding against system failures. Additionally, adding a safety margin to your wire gauge calculations provides an extra layer of security, accommodating unforeseen increases in load or changes in environmental conditions.
In sum, understanding and applying these steps in your wire gauge selection process leads to safer, more efficient electrical installations. As you move forward, keep in mind that every project has unique requirements. Tailoring your approach to meet these specifics while adhering to industry best practices ensures optimal outcomes. With these guidelines, you’re equipped to tackle any wire gauge selection challenge with confidence.
Transitioning into our next discussion on managing subcontractors, remember that effective management and collaboration play significant roles in bringing these technical considerations into reality. Implementing these expert tips not only boosts your project’s success but also enhances safety standards on site, as highlighted in our guide to managing subcontractors effectively on your job site.
Expert Tips to Avoid Common Mistakes

In our journey through the wire gauge selection guide, understanding common pitfalls and how to navigate them is crucial. This guide serves as an essential tool for professionals in the field. Here, we emphasize three major areas: accurate calculations, understanding the risks of underestimating load and distance, and planning for future expansions.
Emphasize the Need for Accurate Calculations and Considerations
Accurate calculations are the cornerstone of a reliable electrical system, making them a critical component of the wire gauge selection guide. They prevent both under and overestimation of wire gauge needs, ensuring safety. Averting unnecessary costs is another critical benefit of precise calculations.
- Accurate calculations ensure you select a wire gauge that can safely handle your electrical system’s demands without overheating or causing fire hazards.
- It involves considering not just the current load but potential future increases in load. This foresight prevents costly upgrades or safety issues down the line.
Remember, selecting the correct wire gauge from the outset is more than just a technical requirement; it’s a commitment to safety and efficiency. Therefore, detailed planning and precise calculations should never be overlooked.
Discuss the Risks of Underestimating Load and Distance
Underestimating the electrical load and distance can lead to significant issues, such as using a wire gauge that’s too small for the job. This mistake has serious consequences:
- A wire that’s too thin for the intended load can overheat. This not only risks the integrity of your electrical system but also poses a severe fire hazard.
- The longer the distance electricity must travel, the more significant the potential for voltage drop. If this isn’t accounted for by choosing an adequate wire gauge, it can lead to inefficiency and underperformance of your electrical devices.
The key takeaway here is to always err on the side of caution. Opt for a wire gauge that comfortably supports your project’s requirements.
Highlight the Importance of Considering Future Expansions
Planning for future expansions when selecting wire gauge is essential. This foresight ensures that your electrical system can accommodate additional loads without requiring extensive rework or upgrades.
- Anticipating future needs and selecting a wire gauge that can support larger loads benefits you in the long run. It’s more cost-effective than having to overhaul your system later.
- This approach aligns with sustainable building practices, as it minimizes waste and maximizes the usability of your installations over time.
By integrating room for growth into your initial wire gauge selection, you make a wise investment in your project’s future viability.
Consider adding statistical data regarding the frequency of electrical failures due to incorrect wire gauge selection, and include expert quotes on the importance of accurate calculations in ensuring safety and efficiency.
To better illustrate the impact of wire gauge selection, a detailed analysis will be provided in the following chart.
This visual representation will underscore the critical points discussed.
For professionals seeking to enhance their project’s efficiency and safety, SmartBarrel’s construction management solutions offer advanced tools for accurate labor tracking and real-time reporting.
In closing, adhering to a wire gauge selection guide that emphasizes accurate calculations, recognizes the risks of underestimation, and plans for future demands equips you with the knowledge to avoid common mistakes. These expert tips not only guide you towards making informed decisions but also underline the importance of safety and efficiency in electrical installations.
In the following section, we will delve into the application of these principles in real-world scenarios, aiming to elevate project outcomes beyond the standard expectations. The insights provided herein are instrumental for the successful execution and foundational integrity of electrical projects.
SmartBarrel Solutions: Enhancing Electrical Projects

SmartBarrel offers a suite of construction management solutions designed to enhance the efficiency and accuracy of electrical subcontracting work, including biometric time tracking, cost and productivity tracking, and safety management. The marriage of innovative construction management solutions with the specifics of electrical projects, such as wire gauge selection, heralds a new era of efficiency and accuracy.
Streamlining Electrical Subcontracting Work
In the realm of electrical subcontracting, efficiency is not merely a goal—it’s a necessity. SmartBarrel steps in to redefine this space by employing AI-based facial verification for time tracking. This system eradicates common inaccuracies like buddy punching, ensuring that every minute on the job is accounted for accurately.
The method is simple yet effective. With a magnetic time clock that mounts easily and syncs swiftly with worker data, the setup process is far from daunting—it’s inviting. SmartBarrel automates time tracking using AI-based facial verification, ensuring 100% accurate labor tracking and eliminating time theft such as buddy punching. SmartBarrel.
- Benefits include:
- Accurate labor tracking preventing time theft
- A quick setup process fostering immediate efficiency gains
Linking tasks and shifts with cost codes via SmartBarrel’s dashboard doesn’t just streamline operations; it revolutionizes them. Electrical subcontractors can manage project costs with unprecedented precision, pushing detailed labor data straight to any software of choice. This integration capability, spanning tools like Procore, CMiC, and PowerBI, ensures that data management for electrical subcontracting is not just possible—it’s painless.
For instance, Prism Electric significantly enhanced project efficiency using SmartBarrel, as detailed in this case study. How Prism Electric Uses SmartBarrel to Track Time with….
Accurate Labor Tracking and Real-Time Reporting
For electrical subcontracting work, where margins can be tight and schedules tighter, the accurate tracking of labor is paramount. SmartBarrel excels in this arena, offering solar-powered, biometric time tracking that thrives under any condition. This adaptability ensures that no environment, no matter how remote or challenging, can disrupt the crucial task of precise timekeeping.
The option to use the mobile app as a secondary clock-in kiosk brings flexibility to the forefront, enabling reliable timekeeping across multiple sites without the need for physical clocks everywhere.
The magic lies not just in tracking but in what happens after. Through real-time monitoring and automated reports, electrical subcontractors can keep job costs firmly under their control. Decisions become data-driven, grounded in the solid bedrock of accurate labor data. This shift towards informed decision-making is not just beneficial—it’s transformative.
A case study on Juneau Construction highlights the benefits of SmartBarrel in enhancing operational efficiency, which indirectly affects tasks such as wire gauge selection. Juneau Construction’s Operational Upgrade.
Enhancing Project Efficiency with SmartBarrel
The ethos of SmartBarrel is one of resilience and reliability. Devices that are solar-powered and self-connected stand up to the rigors of the job site with unwavering steadiness. This toughness, paired with features supporting worker onboarding, daily log automation, and incident reporting, catapults electrical project management into a new stratosphere of efficiency and safety.
Operations teams experience a surge in productivity, courtesy of real-time tracking of onsite personnel by trade and straightforward communication channels. The result? Tasks are coordinated with laser precision, ensuring projects progress smoothly and efficiently.
SmartBarrel’s solutions, particularly in managing project costs and tasks, serve as an effective wire gauge selection guide for electrical subcontractors, ensuring the right materials are used for every project.
In conclusion, embracing SmartBarrel solutions not only streamlines electrical subcontracting work but elevates it. The twin pillars of accurate labor tracking and real-time reporting forge a pathway towards enhanced project outcomes.
Adoption of technology in construction management is on the rise, as shown in the following chart.
This data underscores the growing acceptance and perceived value of technology on construction sites, including solutions offered by SmartBarrel. As we delve deeper into the implications of these advancements, remember that at its core, SmartBarrel’s technology is about empowering electrical subcontractors to exceed their own benchmarks of success. The next section will transition into the broader impacts of these solutions on project management and execution.
Conclusion

This wire gauge selection guide emphasizes that selecting the correct wire gauge is a fundamental element in ensuring the safety, efficiency, and longevity of electrical systems. To facilitate informed decisions in correct wire gauge selection, this guide has meticulously outlined vital steps and expert tips, including:
- Calculating electrical load
- Evaluating distance and voltage drop
- Factoring in environmental conditions
- Utilizing wire gauge charts
- Applying safety margins
Embracing technology solutions like SmartBarrel can further increase project efficiency, as demonstrated by Prism Electric’s successful implementation of SmartBarrel’s time tracking solutions. This integration streamlined their payroll process and provided valuable project data, showcasing how SmartBarrel enhances project management, efficiency, and safety in electrical subcontracting work.
Learn more about Prism Electric’s experience in our case study.
We strongly encourage the adoption of technology solutions like SmartBarrel to complement your efforts in correct wire gauge selection, thereby enhancing project management, efficiency, and safety in electrical subcontracting work. For more insights into optimizing your construction projects, explore our Construction Time Tracking Software.
Electrical installations carry inherent risks, but with the right knowledge and tools, these can be significantly mitigated.
Use this wire gauge selection guide as your go-to reference for all future projects to ensure they are not only efficient but also meet the highest standards of safety. The importance of correct wire gauge selection cannot be overstated—it is essential for the safety, efficiency, and longevity of electrical installations.
Frequently Asked Questions on Wire Gauge Selection Guide

1. How do I know what gauge wire I need?
To determine the correct wire gauge, consider two main factors. First, the amperage requirement. Second, the circuit’s distance. Use a wire gauge chart for guidance.
- Identify the circuit’s total amperage.
- Measure the circuit’s length.
- Consult a wire gauge chart to find the appropriate size.
This method ensures the selection of a wire capable of safely managing the current over its journey.
2. Should I use 12 or 14-gauge electrical wire?
The decision to use 12-gauge wire or 14-gauge wire hinges on your electrical circuit’s specific needs, particularly the amperage.
- 12-gauge wire is thicker, thus offering lower resistance. It is preferable for higher amperage circuits for cooler operation and reduced overheating risk.
- 14-gauge wire is suited for lighter, less demanding circuits.
Opting for 12-gauge wire in higher amperage circuits bolsters safety and reliability.
3. What happens if wire gauge is too big?
Choosing a larger gauge wire than needed is safer because of its lower resistance and superior heat dissipation. Yet, consider the downsides:
- Higher cost.
- Bulkier, making installation challenging.
The decision should balance safety with the practical aspects of installation and cost.
4. What information is required to select the correct wire gauge?
To select the correct wire gauge, essential information is needed:
- Current flow – The amperage running through the circuit.
- Circuit length – Distance for the current’s travel.
- Environmental factors – Impact on wire performance.
- Future needs – Plan for load increases.
With this information, you can confidently choose wiring that supports both present and future electrical demands safely.